The first tips you’ll need before start programming for Symbian using Qt

Last weekend I made my first Qt/Symbian mobile application. It was a very simple project, and its only purpose was to learn how to program for Symbian platform. I made a small application to search information about movies in TheMovieDb, and its source code is available at my github profile.

A Qt/Symbian app is something very close to a normal Qt-based application for desktop, but there are some little differences that can make you confused and some tips you may need, here are my advices for some pitfalls I’ve found.

Instead of showing widgets, add them to a QStackedWidget

(that’s the best solution I’ve found, but it seems to have other solutions)

In desktop Qt, you create a new QWidget and call show() to create a new window containing that widget. This won’t work with Symbian. When you do that, all you’ll get is a small, transparent widget at the corner of your screen.

The solution is to get the QMainWindow of your application, add a QStackedWidget as its central widget and add your new widgets into this QStackedWidget.
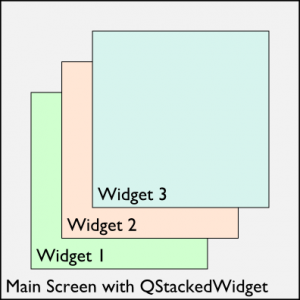
Every new widget must be added to QStackedWidget. It sounds painful, but Qt documentation tells us that when a widget is added to a QStackedWidget, the QStackedWidget becomes its parent.

When you create the first widget and add it to the stack, our QStackedWidget becomes its parent. So, to create a second widget and add it to the stack, you create your new widget as you do normally and asks the parent of the first widget – the QStackWidget! – to add it to the stack.

[code language=”cpp”]
// Create your widget
QWidget *someWidget = new QWidget(parent());

// Get the reference to our QStackedWidget casting the widget parent
QStackedWidget *stackedWidget = (QStackedWidget*) parent();

// Add the widget
stackedWidget->addWidget(someWidget);
stackedWidget->setCurrentWidget(someWidget);
[/code]

Creating menus and associating to positive and negative buttons

Nokia cell phones, even the cheaper ones, have options associated to the positive and negative buttons. Take a look on this picture of an old N70:
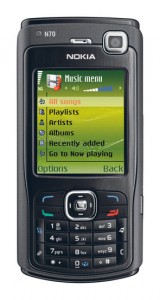
In the picture above, the positive action is Options, the negative option is Back. Creating options like these for your widget is quite simple.

In your widget’s source code, put the following lines in your constructor. Behold the lines where we use setSoftKeyRole to associate the action to a key. In my example, I have a “Back” shortcut and a “Details” shortcut, that access some slots.

[code language=”cpp”]
// Register the negative action</pre>
<pre>QAction *backToMainScreenAction = new QAction("Back", this);
backToMainScreenAction->setSoftKeyRole(QAction::NegativeSoftKey);
connect(backToMainScreenAction, SIGNAL(triggered()), SLOT(removeWidget()));
addAction(backToMainScreenAction);

// Register the negative action
QAction *selectResultAction = new QAction("Details", this);
selectResultAction->setSoftKeyRole(QAction::PositiveSoftKey);
connect(selectResultAction, SIGNAL(triggered()), SLOT(showDetailsAboutTheCurrentItem()));
addAction(selectResultAction);
[/sourcecode]</pre>
<pre>
This code will register the action of each widget. But to make the options show in the screen, we must make the widget’s container – the <strong>QStackedWidget</strong>! – register these actions in the menu every time the widget is created. I put the following lines in the same file where’s my main window containing the QStackedWidget. First we create the following slot:</pre>
<pre>[sourcecode language="cpp"]
// This is a slot!
void MainWindow::updateActions() {
QWidget *currentWidget = stackedWidget->currentWidget();
menuBar()->clear();
menuBar()->addActions(currentWidget->actions());
}
[/code]

In the class’s constructor, we connect the stacked widget’s signals that are emmited when a widget is added or removed to the slot above:

[code language=”cpp”]
connect(stackedWidget, SIGNAL(currentChanged(int)), SLOT(updateActions()));
connect(stackedWidget, SIGNAL(widgetRemoved(int)), SLOT(updateActions()));
[/code]

Don’t believe the Nokia simulator

It’s still experimental. Sometimes you may think you made a mistake and have a bug, but you don’t. The simulator sometimes is confused with menus and soft buttons. If you get lost with your code and can’t find the causes of some obscure bug, try your application with a real device.

Good luck with the Remote Compiler

It’s still experimental too. When I tried to use it, I got some short error messages whose source I couldn’t discover. So, if you don’t use Windows (like me), prepare a virtual machine running Qt SDK on Windows.

Using Automator to make your life with Transmission easier

I have two computers: a Macbook with Snow Leopard, that sometimes I carry with me, and a computer at home with an Atom processor and running Linux that is my media server and downloader. If I need to download something that will take too much time, I put this second computer to download: it has a good connection and it’s always online.

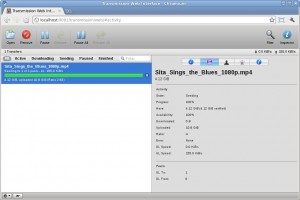
It has Transmission running with its great web interface activated. If I need to download some torrent file, I open its web interface and upload the .torrent file. Good, but… it could be easier.

If you download torrent files very often, the easiest way is to use the watch-dir feature from Transmission: every torrent that you put at some directory is automatically downloaded by Transmission. So, all I needed to do was copying the torrent files from my Macbook to my home server, using SFTP.

To configure your Transmission watch-dir, you must stop the Transmission service (I’m running the transmission-daemon version) and edit the settings.json file, inserting the following settings:

[sourcecode language=”js”]
"watch-dir": "/home/mediaserver/transmission/watch",
"watch-dir-enabled": true
[/sourcecode]

Remember: you must stop Transmission service, edit the file and start it again!

It works, but… It can be even easier, I thought. And I remembered of Automator, a good piece of software that comes with Snow Leopard, and that I knew but never used before.

The idea was: every time a new .torrent file is written at my laptop’s download directory, it should be copied to my home server.

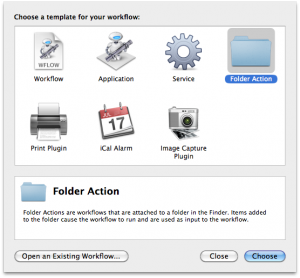
So I opened Automator and created a new Folder Action:

At the top of the new workflow, I selected my Downloads folder:

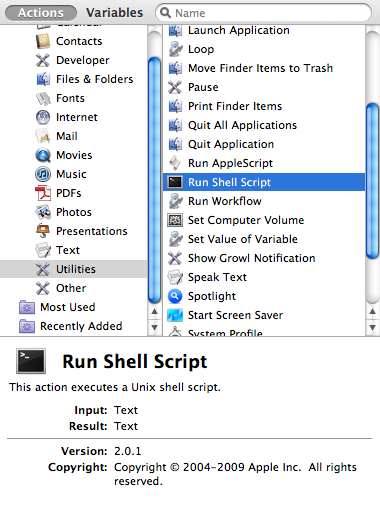
 The next step in our flow is to create a script to copy our files via SSH to the computer that’s running Transmission. Use Utilities -> Run Shell Script to make it:

Now add the following content as the script’s source code. To make it work automatically, I allow my SSH server to receive connections using keys, not passwords. Don’t forget to change the scp’s destination to your computer’s host and directory:

[sourcecode language=”bash”]
for f in "$@"
do
ext=`basename "$f" | awk -F "." ‘{ print $NF }’`
if [ "$ext" == "torrent" ]; then
scp "$f" root@myhostname.asdf.com:/home/transmission/watch
fi
done
[/sourcecode]

That’s it! Save your workflow and test it. Now, every time you click at a torrent file and download it, Transmission will download it automatically.

The Qt Ambassador Kit and my first impressions of Nokia C7

A few months ago, I submitted my personal audio player project Audactile to the Nokia’s Qt Ambassador program. They seem to have liked it and I was accepted into the program.

The good surprise is that they sent me a Qt Ambassador kit: a t-shirt, some stickers and a Nokia C7 mobile phone. The pictures I took aren’t very good, but here they are:

Qt Ambassador Kit

The stickers are beautiful and I’m thinking of where I’ll put them. 🙂 The most attractive item is, obviously, the Nokia C7. It runs Symbian^3, and it was the very first time I could use a device with it. My first impressions:

  • The capactive touch screen is very good. I already test devices from Apple, Motorola, Sony Ericsson and HTC, and I can say that it’s very sensitive. It has support for pinch zoom on images.
  • Symbian^3’s UI is way better than its predecessors. It’s like a mix of the old Symbian (since it’s still Symbian…), iOS and Android. You have non-intrusive alerts at the top of the screen (like a desktop) instead of the old ugly rectangles that older versions of Symbian used for their notifications. The menus still are a bit confusing, but are better than my old Nokia E71’s menus.
  • The AMOLED display is very sharp, its colours are brilliant and the images look great. You have an ambient light detector that changes the display’s illumination, like my MacBook does.
  • The stereo sound from its back outputs are clear and powerful. Nokia knows how to put a good sound into its devices.
  • Its camera has 8.0MP, dual flash and face recognition. It can record videos in HD resolution, but I haven’t tested it yet.

Nokia C7 has a very powerful hardware. Its software is pretty cool and as friendly as Android IMHO (unfortunately Nokia will use Windows Phone instead of Symbian in some time…). The mobile phone was given to me with a short letter asking to develop for it, so that’s what I’ll do. I’ll try to write some Qt application for Symbian, and I’ll report any progress here. 🙂

Listing the packages on Debian/Ubuntu in one line

You can use dpkg to list all the packages that are selected on your Debian or Ubuntu system:

[sourcecode language=”plain”]# dpkg –get-selections[/sourcecode]

But today I needed a way to list only the installed packages in just one line, so I could copy their names and use apt-get to install the same packages on another system. So I used the following command:

[sourcecode language=”plain”]# dpkg –get-selections | grep "[ \t]*install$" | sed ‘s/[ \t]*install$//g’ | awk ‘BEGIN { packages = "" } { packages = packages " " $1 } END { print packages }’
acpi-support-base acpid adduser apt apt-utils […] long list of packages […] xsltproc xz-utils yelp zenity zlib1g zlib1g-dev[/sourcecode]

You can use the output above to easily install the same packages on another system using apt-get install <packages>.

Cool tools to avoid suffering with Windows

After two years working only with Linux and Mac OS, I received a new task that requires using Windows for two months (only two months, happily). It’s hard to get back to this bugful, unstable and confusing world: I do believe Linux and Mac OS are easier to use than Windows, that big world of icons that lead to icons that lead to icons that lead to nowhere, but I’m doing my best.

I tried to find a set of useful and free (as in “free beer” and/or as in “free speech”) tools to make my work easier. They are:

Classic Shell Setup

I don’t know why Microsoft removed the toolbar from Windows Explorer since Windows Vista, but this application tries to put it back there. It also allows you to get some customisation of Start Menu, and get a simple, fast and useful menu like the Windows 9x/ME/2000 times.

Notepad++

I like gedit and kate, and the native alternative for Windows is Notepad++: a good editor for plain text files, like source code.

Pidgin

With support for MSN/Live/whatever network, Google Talk, ICQ, etc. Pidgin is one of the best chat clients. I’d rather use it than the fancy MSN Live Messenger.

Winamp

Why use iTunes or the suffering Windows Media Player if you can use Winamp? It has a clean interface, a good way to organise library (although it’s a little bit iTunesy) and a simple playlist, everything in the same screen. I really love the good and old Winamp.

VLC

Winamp can play some videos, but I think VLC is a better tool for this job. Besides, it has a great support for a huge range  of video formats and features for users with any needs and all experience levels.